Introduction
These instructions will walk you through setting up Multi-factor Authentication (MFA) and Self-Service Password Reset (SSPR) on your NEOMED account. You will prompted to set up your security information immediately after you sign in to your NEOMED Microsoft 365 account (e.g., logins to Outlook on the web, the NEOMED Success Center, VPN, or any other service that uses Microsoft authentication).
These instructions presume you have read the Knowledge Base article Microsoft MFA and SSPR – What is it?
What is needed for setup
- Approximately 5-10 minutes to complete the registration process
- Access to a desktop or laptop
- Mobile phone protected with Passcode, fingerprint, or facial recognition (iPhone or Android)
- Internet Access
- Microsoft Authenticator app (recommended)
MFA/SSPR Setup Instructions
- Open https://portal.office.com via a web browser on a desktop or laptop computer.
- Sign into your NEOMED account with your NEOMED email address and password.
- After you sign into your NEOMED email account, you will see a prompt that asks you to provide more information before it lets you access your account. Select Next.

You will only see this prompt if you have not set up authentication methods (also referred to as security information) for your account. If you have completed the setup already and want to add, change, edit or delete authentication methods, please refer to the Knowledge Base article Microsoft MFA and SSPR – Set Additional Authentication Methods (neomed.teamdynamix.com/TDClient/1938/Portal/KB/ArticleDet?ID=131530)
- After you select Next from the prompt, a Keep your account secure wizard appears, showing the first method for you to set up, the Microsoft Authenticator app. You will register two (2) methods in this setup.
We strongly encourage you to use the Microsoft Authentication App, as it provides a higher level of security and will enable you to use a more efficient, password-less login in the future. If you want to use an authenticator app other than the Microsoft Authenticator app, select the “I want to use a different authenticator app” link. Additionally, you can set up a different method besides the authenticator app for your primary method by selecting the “I want to set up a different method" link.
- If you have not already, on your mobile device, open your respective App Store and search for Microsoft Authenticator. For more information about how to download and install the app, see Download and install the Microsoft Authenticator app. (https://docs.microsoft.com/en-us/azure/active-directory/user-help/user-help-auth-app-download-install)
- Once the Microsoft Authenticator app is installed on your mobile device, select Next on your computer.
- You will then see the Set up your account page, open the Microsoft Authenticator app on your mobile device.
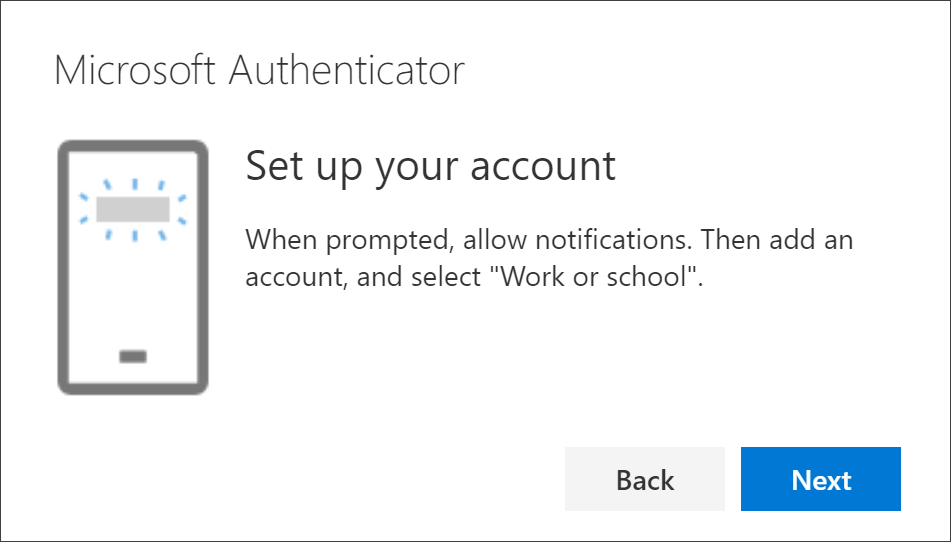
- Within the Microsoft Authenticator app, select to allow notifications (if prompted). Then, select Work or school account if prompted to add an account. If you do not see this option, tap the + icon on the top corner of the app to add an account. From there you should see the option to add a Work or school account.
- You will then be prompted with two options; select Scan QR Code.
- You might receive a prompt asking whether to allow the app to access your camera (iOS) or to allow the app to take pictures and record video (Android). You must select Allow so the Authenticator app can access your camera to take a picture of the QR code in the next step. If you don't allow the camera, you can still set up the Authenticator app, but you will need to add the code information manually. For information about how to add the code manually, see Manually add an account to the app. (https://docs.microsoft.com/en-us/azure/active-directory/user-help/user-help-auth-app-add-account-manual)
- Your camera should be displayed on your mobile device. If so, return to the Set up your account page on your computer and then select Next. The Scan the QR code page will then appear.

- Scan the displayed code on your computer with the Microsoft Authenticator app. The authenticator app should successfully add your work or school account without requiring any additional information from you. Your Authenticator app should take you back to a screen that lists "Northeast Ohio Medical University" and your NEOMED email address below it.
- If the QR code reader can't read the code however, you can select the Can't scan the QR image link and manually enter the code and URL into the Microsoft Authenticator app. For more information about manually adding a code, see Manually add an account to the app. (https://docs.microsoft.com/en-us/azure/active-directory/user-help/user-help-auth-app-add-account-manual)
- Select Next on the Scan the QR code page on your computer. A push notification will then be sent to your mobile device to test your account.
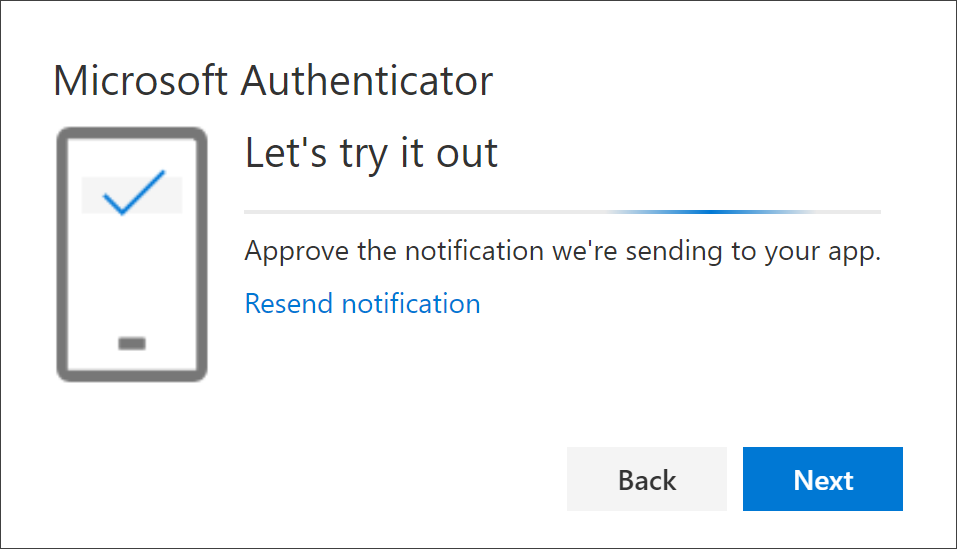
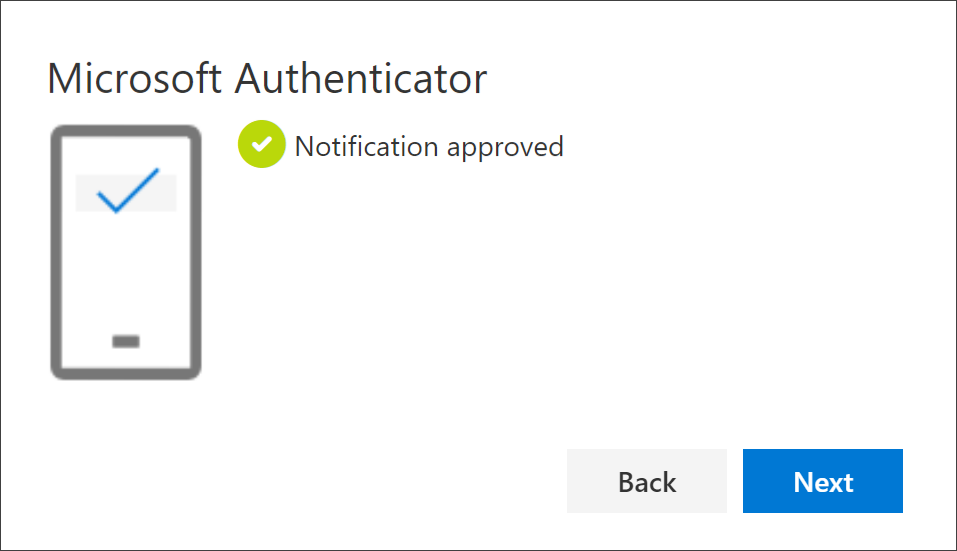
- You will need to enter the two-digit number displayed on your computer screen on your mobile device. Once entered, select Next or Submit on your mobile device. If successful, you receive a notification approved message similar to the one pictured below.
- You will then be asked for a second security method to setup,. By default this will be a phone number (mobile or office number.) On this Phone set up page, choose whether you want to receive a text message or a voice phone call.
- For text messages, enter a phone number that can receive text messages and then select Text me a code. After you enter the code, select Next. You will see a prompt that says "SMS verified. Your phone was registered successfully."
- If you would prefer to get a phone call, enter a phone number you can answer and then select Call Me.
- Review the success notification, then select Next on your computer.
- Review the Success page on your computer to verify that you have successfully set up both the Microsoft Authenticator app and a phone (either text message or phone call) method for your security info, then select Done.
- You will then complete your login to the service you were originally accessing. You may be prompted to Stay Signed In; by selecting Yes, you may receive reduced MFA prompts when trying to access another application during your web browsing session.
Congratulations! By completing this setup, your NEOMED account is now registered in Microsoft Multi-Factor Authentication (MFA) as well as the Microsoft Self-Service Password Reset (SSPR) service.
Upon subsequent logins to a Microsoft 365 service or system configured to authenticate with Microsoft single sign on, you will authenticate with the primary method you registered in this setup. The example below shows the login experience with the Microsoft Authenticator app as the primary (default) method after entering your NEOMED email address and password.

If you encounter issues with your primary/default method, you can utilize the additional methods you established in setup by clicking the Sign in another way link.

You will then be prompted to select a registered authentication method to use to login.
If you encounter issues with signing-in, please refer to the Microsoft Can't sign in to your Microsoft account article.
Set additional authentication methods
It is strongly recommended that after you complete this initial setup, you should configure additional authentication methods (referred to as security information). Please refer to the Knowledge Base article Microsoft MFA and SSPR – Set Additional Authentication Methods for instructions on how to do this.
Change default MFA sign-in method
If you would like to change your default MFA sign-in method, please refer to the Knowledge Base article Microsoft MFA and SSPR – Change Default MFA Sign-in Method.
Change/reset your password and unlock your account
By completing this setup, you can now utilize the Microsoft Self-Service Password Reset (SSPR) solution. This solution allows you to change or reset your NEOMED email password as well as unlocking your account if it gets locked (your account becomes unlocked once you change/reset your password.) Once changed, your password can be used almost immediately.
*NOTE - YOU CAN ONLY CHANGE YOUR PASSWORD ONCE EVERY 24 HOURS*
You can change your password by using the "Forgot my Password" link found when attempting to log into your account and entering your password. Additionally, you can go directly to the reset tool by going to https://aka.ms/sspr.
For more information Knowledge Base articles below for instructions on using the SSPR service: